How to Delete Backup Files in Windows 10
There are plenty of good reasons why you might want to set up Windows 10 backups. When something goes wrong, a backup can help you restore your files and system with little to no data loss. Unfortunately, the downside is a loss of space—these files can fill up your hard drive, especially on smaller-sized drives.
While we'd always recommend that you maintain automatic system backups, Windows will fill up your drive with unnecessary backup files that you can delete from time to time, including older Windows update files. If you want to know how to delete backup files in Windows 10, here's what you need to do.
Deleting Windows File History
Windows 10 offers a far better system for regular file backups than older Windows versions, thanks to a built-in file backup system. Using Windows File History, copies of files in certain critical folders are saved on a regular basis, from every 10 minutes to once daily, with copies saved indefinitely.
Over time, that can mean a vast increase in the storage space being used. If you want to know how to delete backup files in Windows 10, deleting your Windows File History backups should be the first task on your list.
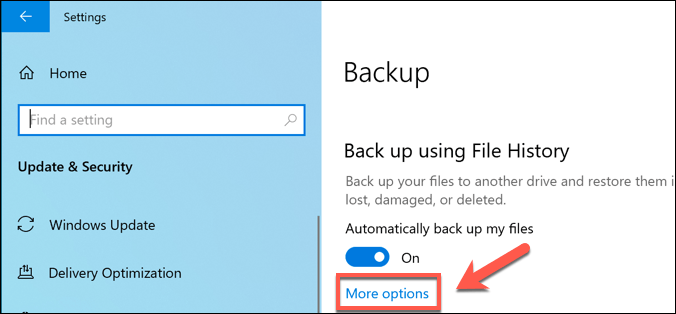
- To start, you'll need to open the Windows Settings menu—right-click the Windows Start menu and press Settings. From here, press Update & Security > Backup. If you're using Windows File History already, press the More options button.
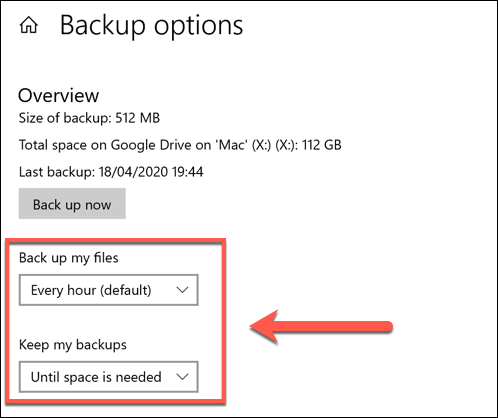
- In the Backup options menu, you can change how often file backups are made and how often they're saved before being deleted. Change these under the Back up my files and Keep my backups drop-down menus.
By default, the Keep my backups option is set to Forever—changing this to delete backups every month, or when space is needed, will increase your available disk space.
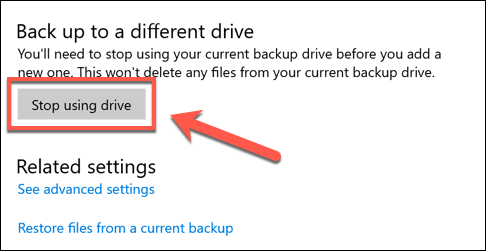
- You can also disable Windows File History entirely by pressing the Stop using this drive option in the Backup options menu. This will remove your current Windows file backup drive, therefore disabling the feature entirely.
- If you want to immediately remove any saved backup files kept by File History, you'll need to right-click the Windows Start menu and press the Windows PowerShell (Admin) option.
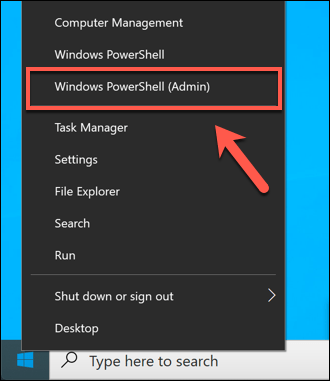
- In the PowerShell window that appears, type fhmanagew.exe -cleanup 0 to remove all but the most recent file backups, then hit enter to run the command. You can replace 0 with another set of days to leave a longer period of backups saved. If the command is successful, a pop-up window will appear to confirm.

Removing Windows System Restore Points
Backing up files in older Windows versions was an all or nothing affair—at least where built-in features were concerned. One of the earliest backup features was the System Restore feature, which stored a snapshot of your current Windows installation and files.
This feature still exists in Windows 10 and is used to create restore points for major system updates. If it's enabled and too many restore points are made, it can take up valuable disk space. Removing some of these restore points can be a good way to clear some space for other files.
- To remove System Restore points, press the Windows + R keys on your keyboard to open the Run window, type systempropertiesprotection and hit enter.
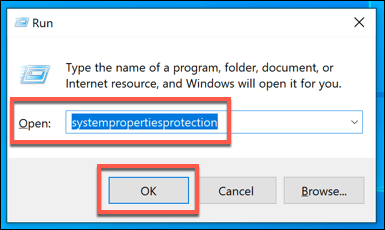
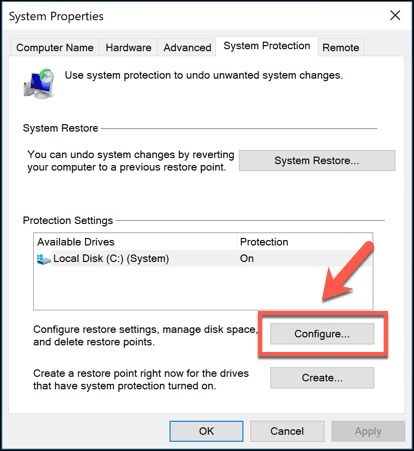
- This will open the System Properties window. In the System Protection tab, press the Configure button.
- In the System Protection window, press the Delete button. This will remove any saved System Restore points. You can also change how much disk space this feature uses by moving the Max Usage slider.
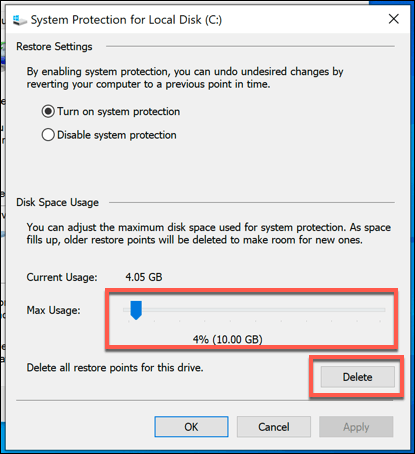
- While it isn't recommended, you can also disable this feature and restore all of the System Protection reserved space for general usage by pressing the Disable system protection radio button. Press OK to save your settings once you're done.
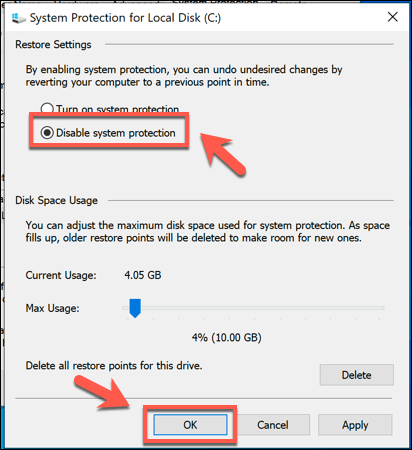
Once disabled, any space previously reserved for System Restore points will be released for you to use elsewhere.
Deleting the Windows.old Folder After Windows 10 Updates
If you want to clear space after a major Windows 10 update, you should start by deleting the Windows.old folder. This folder is automatically created as a backup of your older Windows installation when a major Windows update takes place.
You don't have to worry about deleting this folder in most cases—Windows will automatically remove it a month after an upgrade takes place. If you want to remove it sooner to regain the space faster, however, you can.
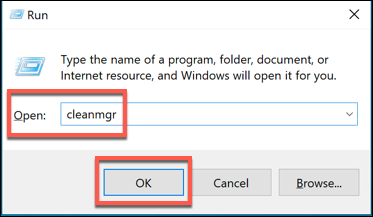
- To delete the Windows.old folder, you'll need to run the Disk Cleanup tool. Press the Windows + R key and type cleanmgr, then click OK to launch it.
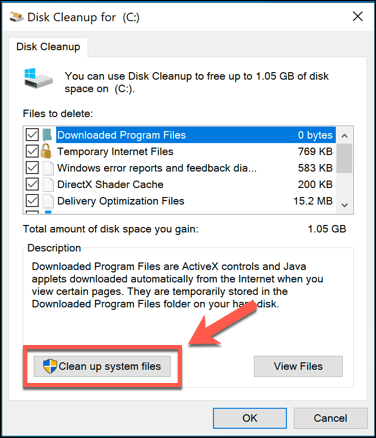
- In the Disk Cleanup window, press the Clean up system files option to view options to clear system files.
- In the Files to delete list, make sure that the Previous windows installation(s) checkbox is enabled. To save additional space, you can also enable other settings or folders to be wiped at this point. Once you're ready, press OK to begin the deletion process.
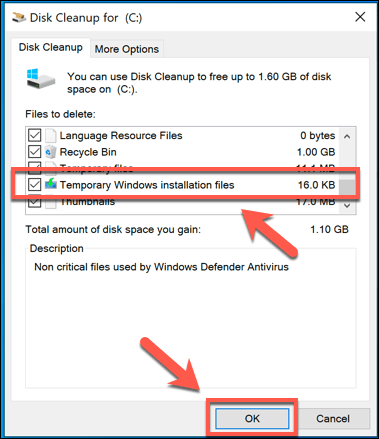
This will remove the Windows.old folder, restoring several gigabytes of space in the process. You won't be able to restore the older Windows installation once you do this, however, so make sure that any updates or new installations are working correctly before you proceed.
Clearing Disk Space with Windows 10
While you should be able to delete any unnecessary backup files in Windows itself, there are other and better ways to create more space in Windows 10. You could, for instance, look for larger files and remove them to free up space for other apps and files.
If that doesn't work, you may need to look at uninstalling Windows 10 software to make room for other essential files—including your important Windows 10 backup files.
Do not share my Personal Information.
How to Delete Backup Files in Windows 10
Source: https://helpdeskgeek.com/windows-10/how-to-delete-backup-files-in-windows-10/
0 Response to "How to Delete Backup Files in Windows 10"
Post a Comment